Team Virtus came up with the idea
of creating Shared Adventure Race Training courses or SH.A.R.T.s. The first one was set up in Lost Valley and
was designed to be a mountain biking course with very minimal bushwhacking. It was a great idea, so I started thinking of
doing a SHART too. I have always loved
the Chubb Trail for its difficulty and different terrains. It is also fairly remote, so it doesn’t get a
lot of use, until lately. 20 years ago I
wouldn’t see more than one other person on it.
Now there are lot of people using it and they are a mix of trail
runners, mountain bikers, and equestrians, but it is mostly used as a hiking
trail. Most people hear Chubb Trail and
wince. I wanted to try to get people out
there, and it fit in with making my Epic Chubby course that I have dreamt of
for years. I set the course to be an
advanced course that would take approximately 8 hours and travel a distance of
20-26 miles. I wanted it to be a mix of
biking and bushwhacking, but also be able to be completed by advanced trail
runners. Yes, you had to have
orienteering experience or you wouldn’t be able to find CP1.
The
start was at the West Tyson Chubb Trailhead.
You were to travel up the trail by bike (or foot), to the second turn in
the trail. The circles on the map were
pretty large so you should have been looking at the center of the circle for
the CP placement. The clue was
boulder. You should have rode through a
boulder section of the trail, got off your bike and bushwhacked in the CP’s
direction, down a small cliff, to another boulder with the CP tied to a tree,
which was growing out of the boulder.
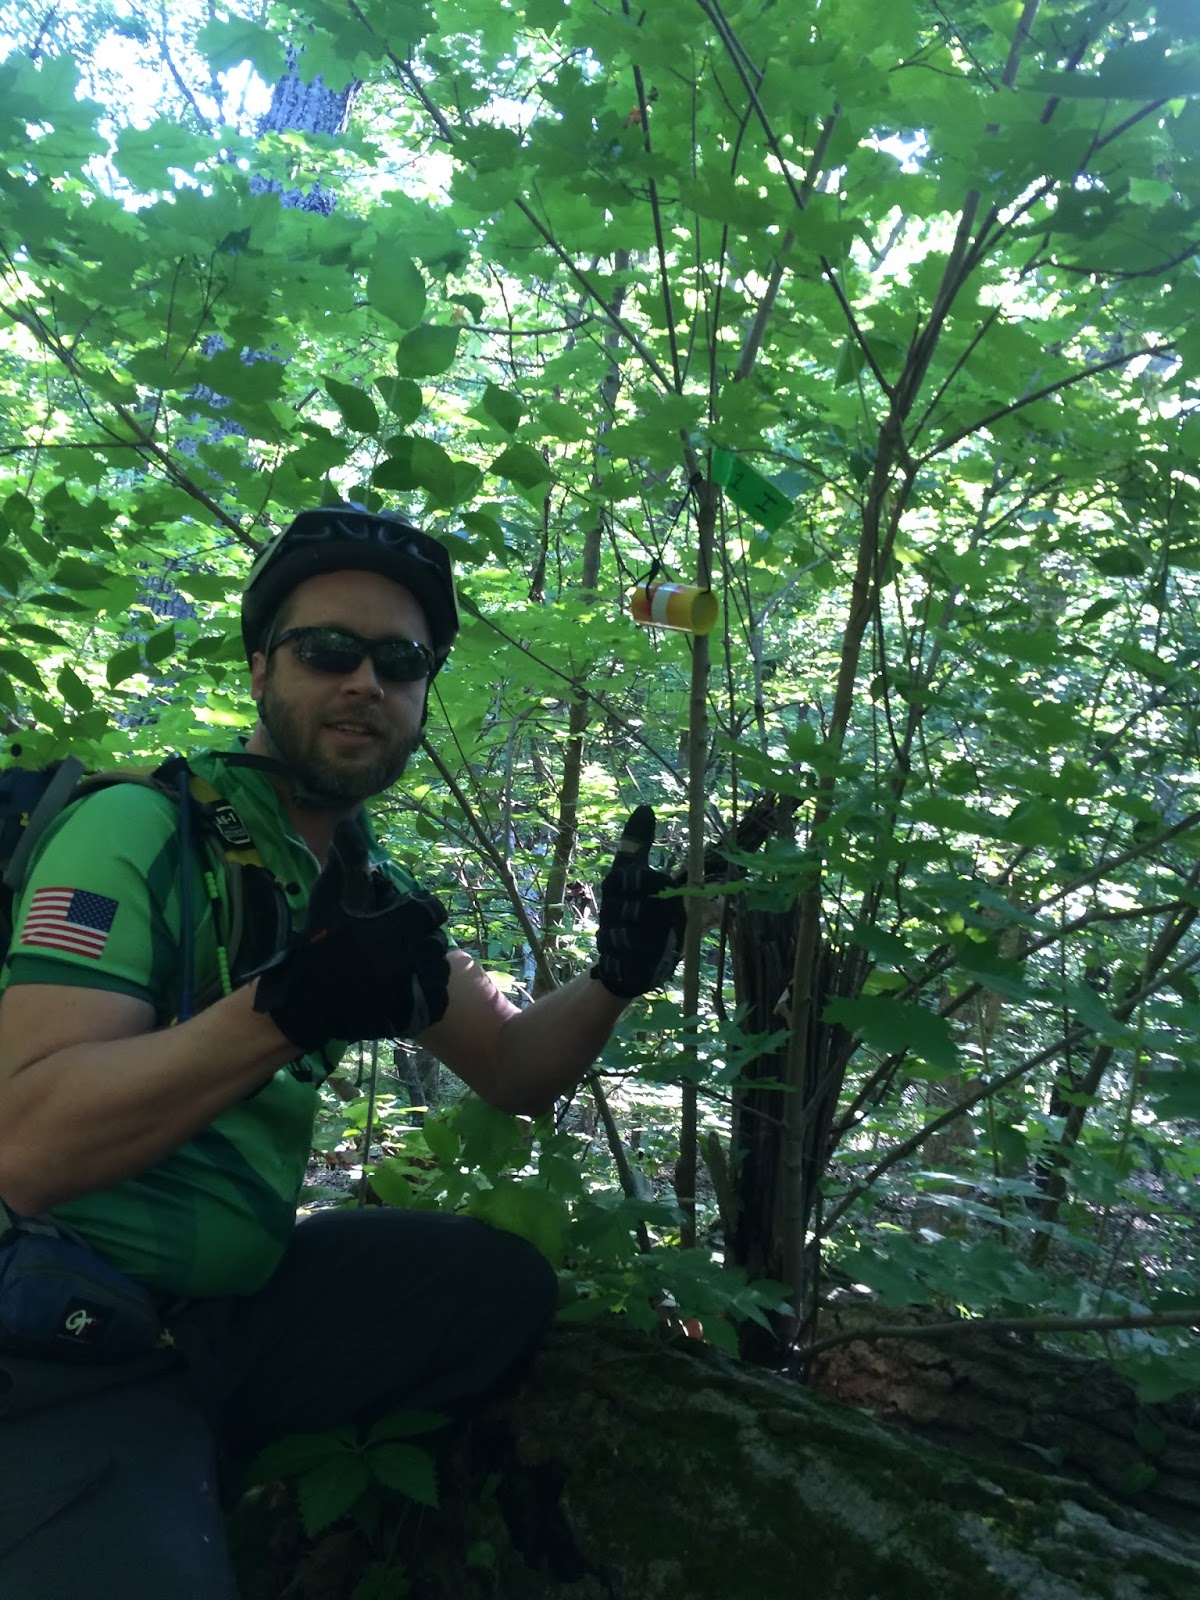
CP1 was easy unless you didn’t know what the CPs looked like or how
small they were, which is why I posted pictures of the CPs beforehand, and each
CP was double marked with green duct tape.
Collect the letter from CP1 and you have (I).

 A short
ride to a switch back took you down the “steps” and a short bushwhack back up
towards the trail you just rode down would take you to a boulder field and CP4
(O). This CP should have been easy, but
I heard some had problems finding it.
Once you found the boulder field, the CP was placed on the largest one
with a tree growing out of it. Now for
CP5, the mother bushwhack. The first
time I went to CP5 I locked my bike to a tree at the steps and bushwhacked
across some serious elevation to the creek and up to the CP. On the way I snapped my shin on a rock and
nearly fell to my death. I found out
weeks later that I lightly tore my Achilles tendon in the process. CP5 was supposed to be extremely difficult,
which it was, but Neil approached it by riding alongside the prairie to the
creek and then bushwhacking up the creek past the creek junction to the
monstrous hill with the little cliff face on top. The CP was atop the cliff face and gave you
(P). This was the best approach, safer
and faster. He then took the creek back
to his bike waiting in the prairie. I,
on the other hand, had to climb all that elevation back to the steps to get my
bike back. The next time we took Neil’s
way again. If you took the creek back to
the prairie and backtracked some to the next creek you could take that one to
the water fall and find CP6 (E). CP6 was
supposed to be really easy, but the vegetation grew in and made the creek exit
hard to find. If you got to CP6 you got
to walk on one continuous piece of rock that was slippery as all can be but
amazingly long and was also part of the beautiful rock formation that was the
waterfall.
A short
ride to a switch back took you down the “steps” and a short bushwhack back up
towards the trail you just rode down would take you to a boulder field and CP4
(O). This CP should have been easy, but
I heard some had problems finding it.
Once you found the boulder field, the CP was placed on the largest one
with a tree growing out of it. Now for
CP5, the mother bushwhack. The first
time I went to CP5 I locked my bike to a tree at the steps and bushwhacked
across some serious elevation to the creek and up to the CP. On the way I snapped my shin on a rock and
nearly fell to my death. I found out
weeks later that I lightly tore my Achilles tendon in the process. CP5 was supposed to be extremely difficult,
which it was, but Neil approached it by riding alongside the prairie to the
creek and then bushwhacking up the creek past the creek junction to the
monstrous hill with the little cliff face on top. The CP was atop the cliff face and gave you
(P). This was the best approach, safer
and faster. He then took the creek back
to his bike waiting in the prairie. I,
on the other hand, had to climb all that elevation back to the steps to get my
bike back. The next time we took Neil’s
way again. If you took the creek back to
the prairie and backtracked some to the next creek you could take that one to
the water fall and find CP6 (E). CP6 was
supposed to be really easy, but the vegetation grew in and made the creek exit
hard to find. If you got to CP6 you got
to walk on one continuous piece of rock that was slippery as all can be but
amazingly long and was also part of the beautiful rock formation that was the
waterfall.
CP7 was
deviously laid out on an island. WTH you
say? Well this is TeamBOR. TeamBOR stands for Balls Out Racing. CP7 on an island is BALLS OUT. You may have gotten to the area and realized
the only way to get the CP was to swim.
I think your heart either sank and you skipped it, or your adventurous
spirit kicked in and you swam across. I
hope you did the later. The current was
strong and you had to swim hard. If the
water was low enough you could wade across.
I waded twice and swam once. The
island was full of Stinging Nettle and you were to find a boat abandoned on the
island. I was afraid the boat would
disappear in high water so the CP was tied to a tree nearby; CP7 (D).


Swim
back to your bike and ride to CP8. The
clue was, “this is where you store your clothes camping.” You are riding along the trail and see a
camper in the woods. You can tell the
flood relocated it here. You now have to
explore it. You look through all the
drawers, closets, and then remember that SHARTs revolve around pooping and look
in the head and find the CP8 (M) hanging from the towel rod above the toilet. The third time I went to it I was amazed that
it was hit by high water again and was in way worse condition as it was before.

Leave
the camper behind and now make the choice to be the real deal, or a sissy, and
decide to grab CP10 first (Sissy!), or ride to CP9 first (Balls Out!) and get
them in order, knowing full well that you will have to ride back to CP10 and
then back past CP9 to CP11. I did this on
purpose to make you decide whether or not you had the balls to ride the rock
garden over and over. Neil had the balls
the first time and rode to CP9 first, making me proud. The sissy way did cut a lot of miles off the
course and would have made your time much faster. If you skipped CP9 (Y), then you really
screwed yourself because it was really easy and a beautiful little swimming
hole with clear flowing water and a nice sunning rock.


You then rode back the way you came and took the trail to a swamp and easily found CP10 (P). You then had to ride back past CP9 to the Castlewood Loop through the “sand pits of hell” to get CP11 (A), which was under an elevated car tire. CP11 navigationally was easy, but someone really buried it in a brush pile under that tire and you had to be pretty flexible to get it. From CP11 you had to decide to ride back the way you came in the sand or ride on. If you chose to ride on you found out that the trail is super muddy all the way to CP12 and the sand may have been easier. I don’t think either way saved any time, but may have saved your sanity. CP12 (N) was in a ruined barn.


You then rode back the way you came and took the trail to a swamp and easily found CP10 (P). You then had to ride back past CP9 to the Castlewood Loop through the “sand pits of hell” to get CP11 (A), which was under an elevated car tire. CP11 navigationally was easy, but someone really buried it in a brush pile under that tire and you had to be pretty flexible to get it. From CP11 you had to decide to ride back the way you came in the sand or ride on. If you chose to ride on you found out that the trail is super muddy all the way to CP12 and the sand may have been easier. I don’t think either way saved any time, but may have saved your sanity. CP12 (N) was in a ruined barn.


 You
then rode the rest of the trail to the Lone Elk Chubb Trailhead and bushwhacked
down a small reentrant to CP13 (T). It
was placed here just to make you ride the entire trail. After that you rode the entire trail back to
the picnic table. Hopefully you took the
dry shorter High Water Route, but if it was dry the Low Water Route is more
fun. At the picnic table you should have
turned onto the fast and dry Flint Quarry Trail and took it to Mimi’s Overlook
Bench. It was easier here to bikewhack
carefully down the hill to CP14 (S) and then out to the trail and then take the
trail to the road and the road to the finish at the West Tyson Trailhead. Bikewhacking here did cut off some sweet
single track, but saved you a terrible climb back up to your bike. Your CPs spelled out, “IPOOPEDMYPANTS” and
you probably did!
You
then rode the rest of the trail to the Lone Elk Chubb Trailhead and bushwhacked
down a small reentrant to CP13 (T). It
was placed here just to make you ride the entire trail. After that you rode the entire trail back to
the picnic table. Hopefully you took the
dry shorter High Water Route, but if it was dry the Low Water Route is more
fun. At the picnic table you should have
turned onto the fast and dry Flint Quarry Trail and took it to Mimi’s Overlook
Bench. It was easier here to bikewhack
carefully down the hill to CP14 (S) and then out to the trail and then take the
trail to the road and the road to the finish at the West Tyson Trailhead. Bikewhacking here did cut off some sweet
single track, but saved you a terrible climb back up to your bike. Your CPs spelled out, “IPOOPEDMYPANTS” and
you probably did!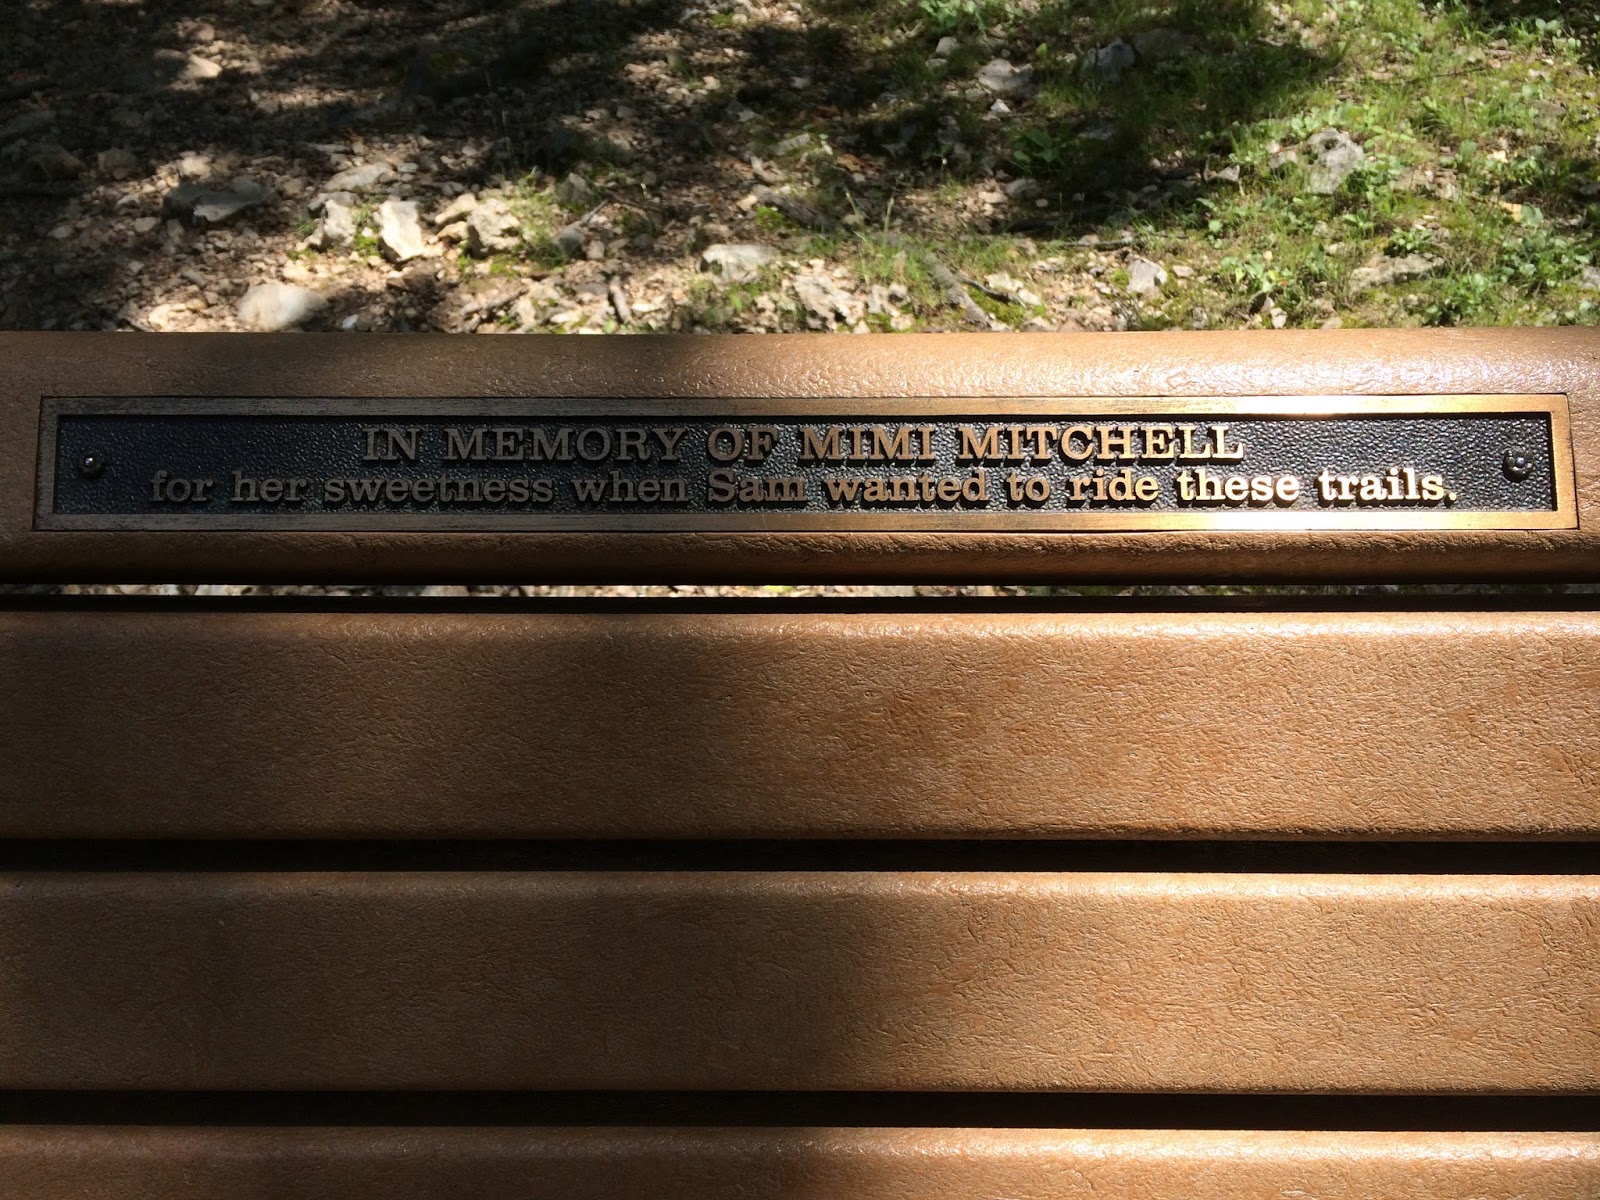

1st place Neil Dickhaus
2. Lo’s Team
3. Amanda and Dave
5. The Vohsens
6. Anyone else who tried and didn’t send in their results.
Last place. Losers that didn’t try.
Stay
tuned for the Grant’s SHART designed for beginners. It will be a road biker’s introduction into
finding CPs and may have a shorter family friendly course in between. I may set up the Chubb SHART again in late
fall and keep it up all winter as it will be easier without vegetation. I will move the water CPs to dry land. There will hopefully be a Chubb SHART Two
that will be a summer course designed to be a water world nightmare and yes
boats will be required. - Ahab.
No comments:
Post a Comment